


Introduction:
Connecting a light switch might seem like a daunting task, but with the right tools and guidance, it’s a job you can handle yourself.
Whether you’ve purchased one of our stylish lights and need to wire a new switch, or you’re replacing an old one, this guide will walk you through the process safely and efficiently.
Step 1: Preparing for the job
Before diving into the task of connecting a light switch, it’s essential to prepare both yourself and your workspace. Start by gathering all the necessary tools and materials.
You’ll need a voltage tester, wire nuts or connectors, electrical tape, and, of course, your new light switch.
Having these items on hand will ensure a smooth and efficient process.
Next, take a moment to familiarise yourself with the existing switch and its wiring. This step is crucial, especially if you’re replacing an old switch. Understanding the current setup will help you make the correct connections later on. If you’re not comfortable with DIY electrical work, it’s always a good idea to consult a licensed electrician. Safety and confidence are key when working with electricity.
Step 1: Gather your tools

Before you begin, make sure you have the following tools and materials:
- Screwdriver (flat-head and Phillips)
- Voltage tester or multimeter
- Wire stripper
- Electrical tape
- New light switch
- Wall plate (if replacing)
- Insulated gloves (for safety)
- Bare wire (approximately half an inch should be left exposed after trimming any worn or frayed parts)
- Terminal screws
Step 2: Understanding light switch types
When it comes to wiring a light switch, it’s essential to understand the different types of light switches available.
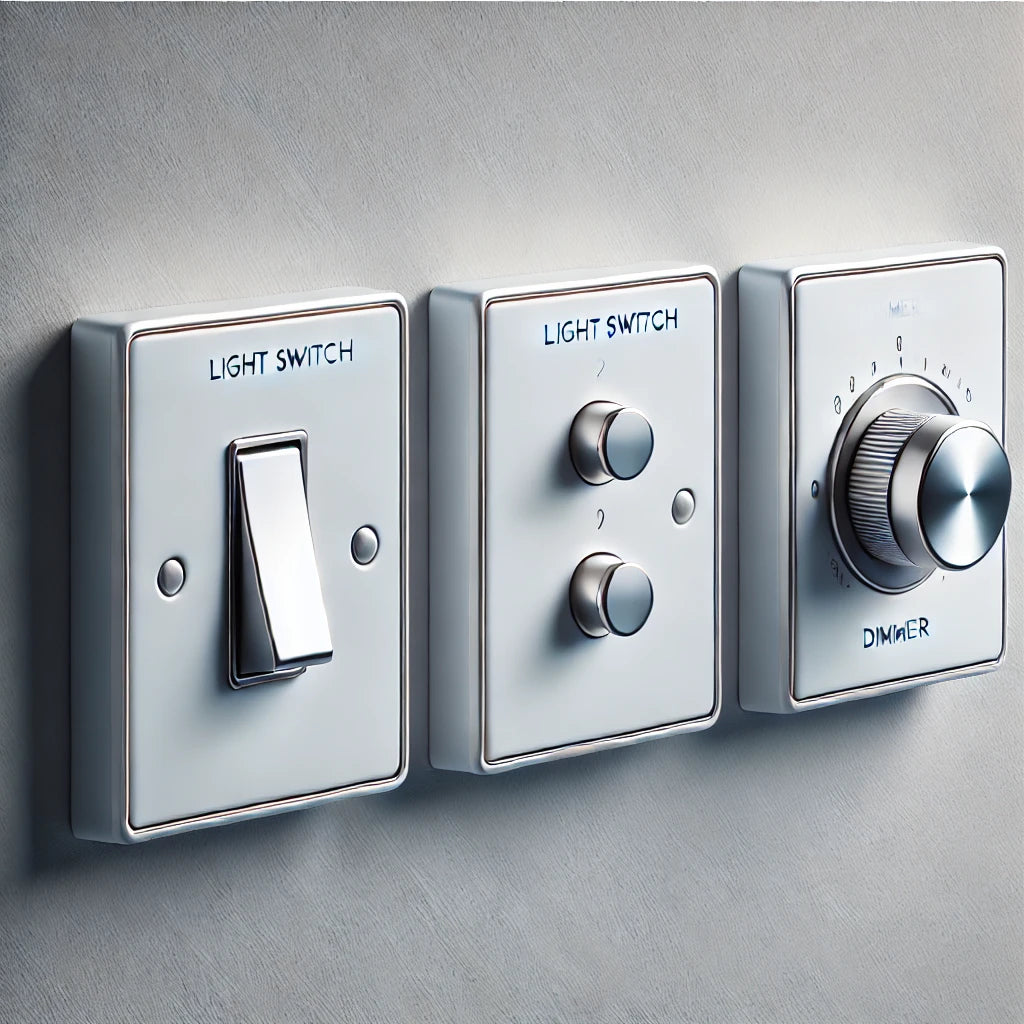
The most common types of light switches are one-way switches, two-way switches, and dimmer switches.

- One-way switches: These are the simplest type of switch, with one toggle to turn a light fixture on or off. They are commonly used in residential and commercial buildings for single-location control.
- Two-way switches: These switches allow you to control a light fixture from two different locations. They are ideal for spaces like hallways or staircases where multiple switches are needed to control a single light fixture.
- Dimmer switches: Dimmer switches enable you to adjust the brightness of a light fixture. They are perfect for creating ambiance in living rooms, dining areas, or bedrooms. There are various types of dimmer switches, including rotary dimmers, slide dimmers, and touch dimmers, each offering unique features and benefits.
Understanding these types will help you choose the right switch for your needs and ensure your light switch wiring is done correctly.
This knowledge will also make it easier to wire a light switch yourself, following straightforward DIY steps.
Step 3: Choosing the right light switch & switch plate for your light fixture
Choosing the right light switch for your needs can be overwhelming, especially with the numerous options available. Here are some factors to consider when selecting a light switch:
- Number of switches: Determine how many switches you need to control a single light fixture. If you need to control a light fixture from multiple locations, a two-way switch or a dimmer switch may be the best option.
- Type of lighting: Consider the type of lighting you are using. If you are using LED lights, you may need a dimmer switch that is specifically designed for LED lights to ensure compatibility and avoid flickering.
- Wattage: Check the wattage of the light fixture and ensure that the light switch you choose can handle the wattage. Overloading a switch can be a safety hazard.
- Brand and quality: Choose a reputable brand that offers high-quality light switches. Look for switches that are UL-rated and meet local electrical codes to ensure safety and reliability.
- Style and design: Consider the style and design of the light switch. Choose a switch that matches your home’s décor and style, whether it’s modern, traditional, or somewhere in between.
By considering these factors, you can choose the right light switch for your needs and ensure that your lighting system is safe, efficient, and functional.
Step 2: Turn off the power using a voltage tester

Safety is the most important part of any electrical project.
- Locate your home’s circuit breaker panel.
- Turn off the breaker for the circuit you’ll be working on.
- Use a voltage tester to confirm there is no power running to the switch. Simply touch the tester to the wires inside the switch box; it should not light up or beep.
Step 6: Safety precautions and best practices
When working with electricity, safety should always be your top priority. Begin by turning off the power to the circuit at the main electrical panel.
This step is non-negotiable and ensures that you won’t accidentally come into contact with live wires.
Use a voltage tester to double-check that the power is indeed off before you start working.
Always follow the manufacturer’s instructions for your new light switch. These guidelines are designed to ensure that the switch is installed correctly and safely.
When making connections, use screw terminals instead of plug-in connections for a more reliable and secure setup.
Keep your workspace clean and organised to avoid any accidents, and be mindful not to overload the circuit with too many devices. These best practices will help you complete the project safely and effectively.
Step 3: Remove the old switch
- Unscrew the wall plate covering the existing switch and set it aside.
- Remove the screws holding the switch in place within the electrical box.
- Carefully pull the switch out, exposing the wires.
- Take note of where each wire is connected to the switch. You may want to take a picture for reference.
Step 4: Disconnect the wires
- Loosen the terminal screws on the switch and disconnect the wires.
- You’ll typically see three types of wires connected to terminal screws:
Black (live wire): Carries power from the breaker.
White (neutral wire): Returns power to complete the circuit.
Green or bare (ground wire): For safety, grounding the circuit.
- Ensure the ends of the wires are clean and free of damage. Use a wire stripper to expose fresh copper if needed.
Step 5: Connect the new light switch
- Identify the terminal screws on your new light switch and the black wires:
The silver screw is for the neutral (white) wire.
The green screw is for the ground wire.
- Connect each wire to its corresponding terminal screw:
- Wrap the black wire around the gold screw and tighten.
- Attach the white wire to the silver screw and tighten.
- Secure the ground wire to the green screw.
The switch leg is the wire that connects the light fixture to the switch, carrying power to the light when the switch is activated.
Step 6: Secure the switch
- Push the wires carefully back into the electrical box, ensuring none are pinched or bent sharply.
- Align the switch with the electrical box and secure it using screws.
Step 7: Attach the wall plate
- Align the switch plate over the switch.
- Tighten the screws to secure the wall plate, being careful not to over-tighten and crack it.
Step 8: Test the switch
- Go back to your circuit breaker panel and turn the power back on.
- Test your switch by flipping it on and off. If the light works, you’ve successfully connected your light switch!
- If the light doesn’t work, turn off the power again and double-check your wiring connections.
Step 13: Testing and troubleshooting
After you’ve completed the wiring and installation of your new light switch, it’s time to test the circuit to ensure everything is working correctly.
Head back to the main electrical panel and turn the power back on.
Then, test your new switch by flipping it on and off. If the light turns on, congratulations—you’ve successfully connected your light switch!
If the light doesn’t turn on, don’t panic.
First, check the wiring connections to ensure they are secure and not loose. Sometimes, a simple adjustment can solve the problem.
If the issue persists, consult the manufacturer’s instructions for troubleshooting tips. If you’re still having trouble, it might be time to seek assistance from a licensed electrician.
Regularly inspect your switch and wiring for any signs of wear or damage, and replace the switch if necessary to maintain a safe and functional electrical system.
Step 9: Additional tips and advice
- Upgrade to a dimmer Switch: If you want to adjust the brightness of your lights, consider upgrading to a dimmer switch. These work well with many of the LED-compatible lights we sell.
- Decorative wall Plates: Match your light switch to your room’s decor with a decorative wall plate.
- Safety first: If you’re unsure about any step, consult a licensed electrician. Wiring a light switch can be a manageable DIY task with the right tools and safety precautions. For simple on/off control, consider using a single pole light switch. For controlling a light from two locations, use two way switching. Ensure your switches are wired correctly to avoid any electrical issues.
Conclusion:
Connecting a light switch is a simple task when broken down into steps. By following this guide, you’ll be able to safely install or replace a switch, ensuring your lights work seamlessly with your home’s design.
If you’re looking for stunning lights to pair with your new switch, check out our collection of chandeliers, pendants, and modern lighting solutions.
Need help or inspiration? Contact us today!

Leave a comment
All comments are moderated before being published.
This site is protected by hCaptcha and the hCaptcha Privacy Policy and Terms of Service apply.